I plan to leave Seattle for my next cruise in early September, perhaps around the 12th or so, maybe sooner, maybe later. More on that later - hopefully my next blog post will be about my starting to move with a few details about my plans over the next few years. Without giving too much away - think endless summer, blue warm waters, topical paradise's and interesting destinations. Its sooo close at this point, but not quite there.
In the mean time, over the past six weeks I've been busy on all sorts of projects. Some of these things probably deserve their own separate post but I'm going to glom everything together into one massive post - the mother of all blog posts.
I don't really expect anybody to read all of this. Here are some of the things I've been working on...
Small things first:
- Following up on my post detailing how my new locker gaskets were formed, I've also sealed the cockpit engine access on the cockpit sole. There was a small leak in one corner of this hatch. Fixed now.
- I've written about how I've made it easier to remove the stove from my galley by carving little indentations in the teak surround. This has been useful, as I had one last project to do on the stove. After I replaced the stove gimbal pivots I discovered that the aft stove gimbal pivot lock was in the wrong spot. There is a way of locking the stove from rocking back and forth which involves sliding a short rod into a hole in the surrounding enclosure. Well, the hole in the aft enclosure face was in the wrong spot. So I marked the new spot, removed the stove, made some measurements, replaced the stove, tested the spot, removed the stove, started drilling the hole, replaced the stove, tested the hole, removed the stove, adjusted the hole, replaced the stove, tested the hole, removed the stove, marked the hole, epoxied the hole, replaced the stove, tested, removed the stove, finalized the spot by adding a metal cover and sanding the epoxy, replaced the stove. I'm pretty happy that the stove is easy to remove and install now. The stove now locks solidly in place. See how tedious boat projects can be...if you're really attentive to every little detail?
- Bought passage charts for my known coming voyages. These are charts which cover a very wide area. One chart covers the west coast of America down to San Diego. Another covers San Diego to Mexico and part of the South Pacific. I had some similar charts for my trip to Hawaii and back to Seattle. I found them useful - as I would update them daily just to prove to myself that I was actually making progress. On longer passages its nice to have a way to track progress. It was pretty exciting looking over my new charts and looking at my upcoming voyaging areas!
- Created two amsteel pendants to lower the attachment point for my lazy jacks from the bow shackle at the mast where my running backs attach. The lazy jacks were chafing my running backs as I ran them up and down. This is now solved. I realize this is hard to visualize. Just think of it as yet another problem that was fixed.
- Created new fitted sheets. I spent some time visiting family on Vancouver Island and Vancouver. While on Vancouver Island visiting my Mother I had her teach me how to create fitted sheets for my forward berth. New top and bottom sheets. They're awesome. This sewing stuff isn't so hard.
- Started to clean and lube my winches. At this point I've done four of six and have found one broken spring. The two on the mast will be finished tomorrow.
Some of the larger projects, most with pictures, follow:
Installed a new fridge:
My old fridge was a alder/barbour cold machine, one of the original DC fridges using the then new danfoss compressor. The fridge was working - but I suspect that it was 20 years old and I just did not trust it anymore. I wanted to do a little preventative work now to try to avoid it breaking down over the next few years. On the one hand, changing a working system introduces the potential for the new system breaking instead...but I felt that I should do this.
I bought a frigoboat capri 35 with a Merlin smart speed controller and a Guardian thermostat. The thermostat is digital, and is therefore much more accurate than what I used to have. The new system should be much more efficient.
The merlin smart speed controller is cool - it keeps track of how often the fridge comes on, and for how long, and optimizes the speed at which the compressor runs. It turns out that to be most efficient, the compressor should be run for as long as possible - which means at a low a speed as possible. My old fridge had a single speed (high) where it would draw 6 amps - my new fridge has 6 speeds it can run at and the most efficient (slowest) speed only draws 2.1 amps. The speed controller will adjust the speed to try to achieve a run time of 20 minutes an hour which is can do in Seattle by running at the slowest speed for 8 minutes and then being off for 20 at which point the fridge box has risen from 40deg to 42 and the thermostat turns the cycle on again. The guardian thermostat is accurate - it allows me to set the set point for the fridge and how many degrees it can rise before turning on.
In the tropics I'll monitor my power usage and may need to raise the temperature of the fridge from its current set point of 40 - on my last trip I had the temperature quite a lot higher which was fine for the types of food I kept in there.
This project was fairly straight forward, just installing hardware I bought.
 |
| Installing thermostat wire high in fridge box |
 |
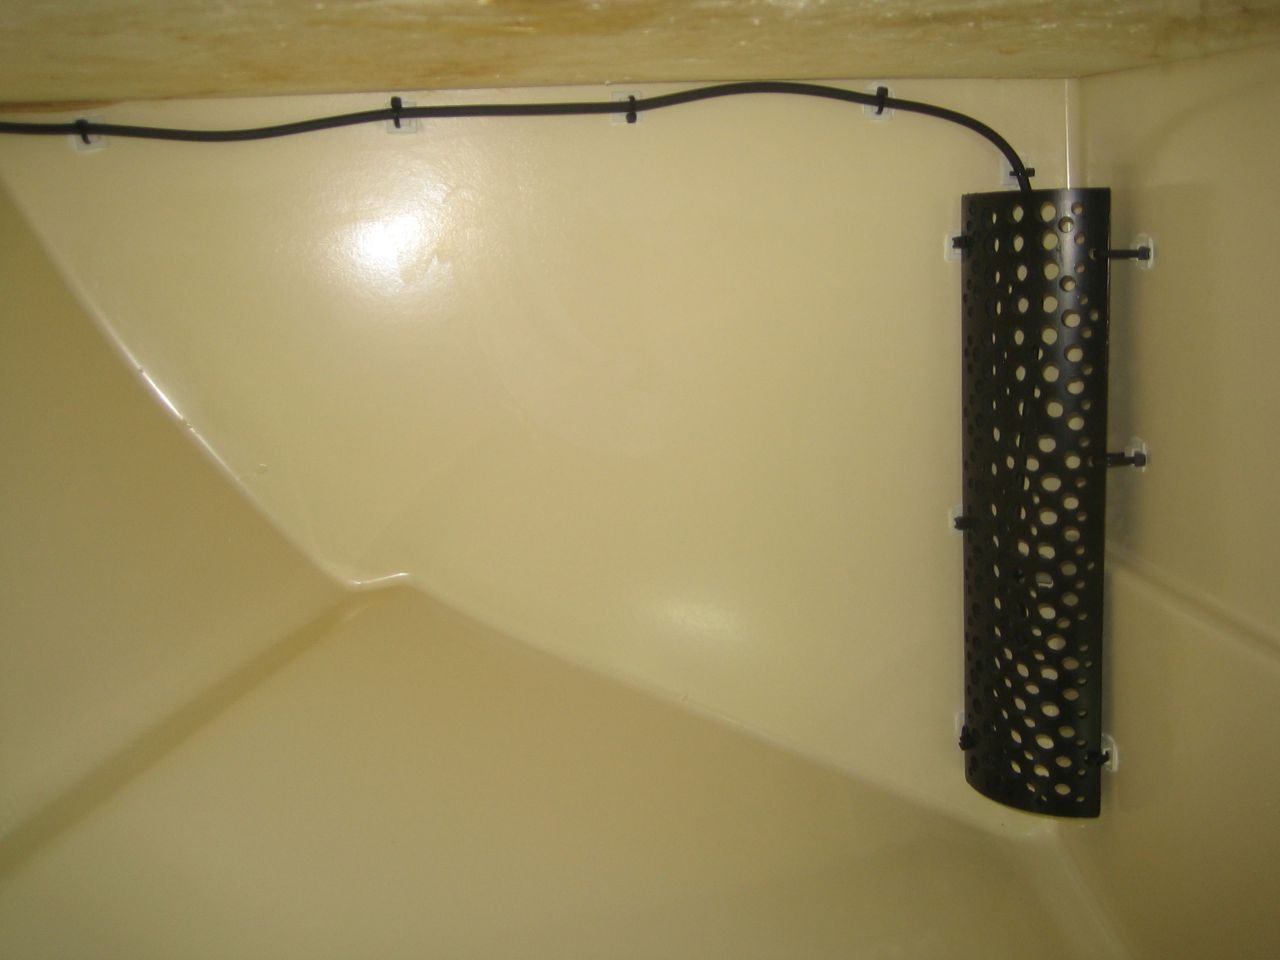
| A little cage surrounding the thermostat |
The thermostat needed to be installed on a wall of the fridge box where the evaporator wasn't. I choose a back wall. However I tended to pile food up in the fridge and I didn't want food to be piled up against the thermostat. So I ended up buying a 4" PVC pipe, quartering it and drilling a bazillion holes to aid airflow. I'll find out if this ends up being effective - if not, I'll relocate it later...
 |
| The guardian thermostat panel |
Aft water tank:
This is the second time I've had to work on my aft water tank.
The last time I worked on it, I was hoping never to see the insides of this tank again. The last time I worked on the tank it was due to their being a leak - I fixed that. As part of that project, I decided to finish the tank liner with an epoxy in order to seal the tank better. I don't recall spending too long on surface preparation for the epoxy step - I spent quite a lot of time fixing the leak and then gel coating the fiberglass I used - but the preparation for the final epoxy step was a little light. I used to think of all epoxy's as some sort of magic glue which would stick to anything. It turns out this was wrong.
When I got back from my last cruise I inspected my water tank carefully and noticed a small bubble in the epoxy which after a little prodding turned out to be a massive delamination of the epoxy from the tank interior.
Its a little hard to see from the picture, but there is a large piece of epoxy sitting on top of the divider between the aft and forward sections of the tank. Once I had pulled some epoxy out, I could pull sheets of it off. I briefly considered turning this into a storage area to avoid all the work on fixing the tank to make it potable water safe again, but decided to return it to use as a water tank.
Getting the lid off is a chore.
 |
| Lid removal tools |
 |
| Cut and pry the bar into a gap you create, then pound the bar down between the lid and tank |
 |
| Use wedges to create gaps, and pound them around the tank lid |
Once the lid is off, you will have a lot of silicone to clean up. Its not a lot of fun.
Once it was cleaned up, I needed to remove the old epoxy liner from the tank. This should have been pretty much impossible as the epoxy should have bonded to the tank in such a way that it needed to be ground off - but by applying a lot of pressure with sharpened putty knives I was able to scrape all of the epoxy off. I also scraped some of the gelcoat off, notice the pitting in the photo below. This took about three days of hot sweaty work - balancing like a tripod while pressing carefully and hard on the sharp putty knife to have the epoxy flake off and shoot in all directions. I had the whole area tented off with plastic - no photos of that, sorry.
 |
| Gelcoat pitting after removal of old epoxy liner |
At this point I don't really want anybody to follow how I approached the repair and lining of the tank - its hard to get definitive answers to how to finish a potable water tank. Companies tend to shy away from this area, as government regulations require that if a company declares a product safe for some use - they need to prove it for a particular tank size, construction and process. Nobody is interested in certifying their product safe for water tanks on small sailboat fiberglass water tanks.
So after a lot of reading, I decided on using an epoxy liner - but with a much better epoxy than I used last time and also much better preparation to the surface. The epoxy is a 100% solids epoxy. I think it will be ok...
I first needed to repair the damage to the gelcoat I had inflicted with my putty knives removing the failed epoxy. I used an Adtech product, P-17 white with a black hardener, a high head resistant rigid polyester filler. This is an epoxy as well - combine filler and hardener, mix and apply to tank before it hardens. I applied a good solid coat to the entire tank and then sanded with 80 grit all around to create a good surface to epoxy to.
The epoxy I used was Fiberlay Pro Glas 1200 UV epoxy resin and the fast hardener. Do your own research and pick your own route if you need to pursue this type of project...
The final piece of this puzzle is what type of silicone sealant to use to seal the tank. I used the 3M marine silicone last time but have discovered that it contains chemicals that may not be good to have in a potable water tank. I couldn't find a source for a food safe silicone, so after reading, discovered that aquarium silicone sealants are good for water, as they are used to seal tanks which have fish swimming in them, and tropical fish are very sensitive to chemicals. So that's what I bought, through amazon. A little later I was in Tacoma Screw here in Ballard and saw they have their own branded silicone sealant which is NSF 51 food safe - that would have been a good choice.
I replaced the lid to the water tank yesterday, sealed it and will wait 7 days for the silicone to fully cure.
Bomar deck hatches:
I noticed some delamination between the silicone seals in my deck hatches and the polycarbonate lenses. I didn't want these to leak and my buddies at Yacht Fitters have gotten good and fixing these hatches and they passed along some advice on how to proceed. I removed the hatches, popped the lenses out and cleaned everything up. I then saw a little corrosion on the hatch frames and thought I would just spray paint a patch as I wasn't too concerned with the appearance. So I sanded away the corrosion, bought a zinc spray paint primer, applied it, and then added two coats of spray paint. To cut the story short, the spray paint failed badly and I ended up sending the frames to Seattle Powder Coat, which did a fantastic job. Clear cut plastics in Fremont cut new frames for me. Yacht Fitters fit the frames into the hatches with my helping out.
 |
| Looking out my new hatch! |
The new hatches are really nice. I can see through them again!
Halyards:
By the end of my last cruise, I discovered that my jib halyard had chafed badly. The chafe happened just as the halyard entered my halyard restrainer.
 |
| My old jib halyard, at the top of the splice at the sail attachment end |
I've heard about riggers adding dyneema chafe guards to halyards from a few sources. Luke at Yacht Fitters does this, and I had him build two new halyards for me - I thought I would have a new main halyard made with a chafe guard as well. The results are really nice - I recommend Yacht Fitters for this work if you're in the area.
 |
| My new main halyard on left, my old-old main halyard which has become my trysail halyard |
The new halyards are core dependent - a dyneema core with a polyester cover. Luke removes part of the cover, splices on the dyneema chafe sleeve and then performs the eye splice in a manner which I don't really understand but which ends up being much nicer than the Samson splice they present in their splicing manual.
Also halyard related, I added a little more organization to my mast by adding line holders to hold my lines up:
 |
| Hooks to hold halyards at the mast |
Furler and halyard restrainer:
My original jib furler was as old as the boat, 22+ years. It was another piece of gear I was losing trust in. Getting new parts would be difficult, and there are better designs out now. I bought a Schaefer 2100 furler, Luke came by and installed it one day. I helped out, it was pretty interesting seeing how a furler is installed, while the mast is up.
 |
| Schaefer 2100 furler |
The furler came with a new halyard restrainer which was much better than the model I already had on the mast - so I went up and drilled the old restrainer out and drilled and tapped
the new restrainer in.
The schaefer restrainer is much nicer. I suspect that if I had the new restrainer that I wouldn't have had the jib chafe I experienced last time. With the jib halyard having a dyneema chafe sleeve and a new restrainer at the old problem location, I think that problem should be fixed. I'll find out...
The schaefer furler manual suggests that the top of the upper swivel be less than 6 inches away from foil top cap. Originally the distance was 12 inches, so I constructed a circular strop made from 1/4" amsteel. The strop worked out really well. With the strop installed, the top of the swivel is just under 6" away from the end cap.
 |
| Sail head to strop to swivel to halyard to restrainer to sheave's and down. |
Reef lines:
While I was out on my last cruise, I also noticed that my reef lines were chafing in the region of the aft boom end cap. There are sheaves in this region, with aluminum plates separating the sheaves from each other - the plates rise above the sheaves, and the reef lines were chafing on the plates. I ground the plates down to be smaller, which will help with the problem. I also installed dyneema chafe sleeves in the region of the chafe - I did this work after a few hints and some instruction from Luke at Yacht Fitters. The chafe sleeve goes on pretty easily. I placed one of the sleeves in the wrong spot and was able to cut the whippings, remove the sleeve bury's, move the sleeve to where it needed to be and install it again without any damage to the reef lines. Nice!
I discovered after adding the chafe sleeve to the reef lines that they no longer fit out of the boom end cap - the diameter of the line increased enough that they would not exit cleanly. So I ground down the end cap to accommodate - no big deal.
I decided to buy new reef lines before adding the chafe sleeve - one of the lines was chafed badly enough it needed to be replaced anyway, and the second line was ok, but I wanted to keep them both in sync and so bought two new lines.
There are a few things going on in the picture above. I have a new topping lift - I had used amsteel for the line which exits the boom, goes up to the pulley and back down to the boom cap. Amsteel is slippery and I found it tedious to cleat it off - I needed to have a lot of wraps around the cleat or it would slip - its pretty surprising. I had some warpspeed on board intended for something that was no longer needed, so I used that for my new topping lift - the polyester cover cleats off much easier. This was my first core dependent splice - it worked out, I used the Samson recipe.
You can see the chafe guards on the reef lines. The other new thing I added are two short amsteel lines which attach to the reef lines as they wrap around the boom. These straps hold the reef lines back toward the end cap. On the port side of the boom you can see an amsteel line going from the padeye, under the clew strap to the reef line wrap. This is to hold the reef line from moving forward. I wanted the reef lines to pull back on the new sail clew, not simply pull down. I found that the wrap around the boom would continually move forward to be under the reef clew rather than remaining further back. I'll see if holding them in place like this works - it seems simple enough.
Monitor trim line:
On the monitor self steering wind vane, there is a line which is used to adjust the trim of the vane to allow you to make course corrections. This line is a loop which goes around a large sheave at the monitor and then for Luckness, forward along the starboard side of the cockpit to a SS ring which is under tension by some shockcord.
The important piece of this is that you pull on the loop of line to adjust the vane direction.
When I was leaving last time I didn't have a good solution for this line - I used a small diameter dinghy control line and fastened the ends together by stitching and then whipping. It was a bit of a mess. The join would enter the sheave and then get tripped up most often popping the line off the sheave. So I continually had to watch were the join was and adjust it to remain far from the sheave. Anyway, it was tedious.
The Scanmar Monitor manual talks about this control line being 1/8" dacron, but beyond that, doesn't say anything else. I couldn't find 1/8" dacron - is it even made anymore? High tech lines have taken over now.
Once again, I'm using amsteel. Amsteel is super easy to splice into endless loops, but is a little slippery for this application. If I find the control line slipping, I've decided that I will add some wax to the equation.
I now have a new 7/64" amsteel trim line. Here are my old and new trim lines, in the join areas:
 |
| New amsteel monitor trim line splice region - slick! |
I don't show the bury region of the new splice - I taper the amsteel tails nicely so as you run your fingers along the line you can't feel where the bury happens at all. I can now pull on the trim line and as the splice enters the sheave nothing happens, the line isn't tripped. It is now a real endless loop.
This is only a small thing - but during my last cruise I was finding myself, at night, in large wind and waves, leaning over the back of my cockpit holding the monitor sheave while I tried to adjust the old splice to a more favorable area of the line. I won't miss those moments.
Dorades:
During my last cruise, I found that while I was on the same tack (either) for a long time while getting water over the deck, that my port side dorade would leak. The water was entering the headliner under the dorade, leaking into a light which is mounted there, filling it up and shorting it out. It got to the point where the on/off switch was inoperable due to corrosion and the light was dimly staying on all of the time. I adjusted something in Hawaii but the dorade leaked again on my trip to Seattle.
I recently took the dorade apart again.
 |
| The port side dorade |
The dorade box surrounds a
mushroom vent which can be closed. I thought the mushroom vent was the problem, that water was intruding between the top of the vent and where it was meant to seal. I took the vent off and while doing so discovered that there was no sealant between the vent base and the cabin top in a few areas - and that there were rust streaks under the vent base over to the vent hole - showing the path the saltwater was taking. I cleaned everything up, sealed the vent well and this problem should be fixed. Then I did it for the starboard dorade - it wasn't leaking but it ended up having the same lack-of-sealant problem, so I'm happy I fixed it.
Teak vent in hanging lockers:
My two hanging lockers continually have a mildew problem, mostly in the lower region of the locker where the air doesn't circulate due to clothes hanging above. I think a way of helping the mildew problem will be to allow air to circulate - so I've just cut two holes in this region of the lockers and will install teak vents.
 |
| Holes ready for their vents |
Teak shelf in navigation station locker:
There is a small locker beneath the nav station which was designed as a hanging locker. I use it for footwear, but this only occupies 1/2 of the locker - the upper region was unused.
I installed a shelf in this locker. After measuring and cutting some teak grating, I mocked up the shelf and then epoxied four hardwood tabs into the walls of the locker. Once the tabs were in place, I continued building the shelf, applied teak oil and have installed it. The shelf is removable, but fits snugly when installed. I'm not sure how I'll use this space - possibly food storage, but its now a large handy area to store something.
 |
| The four hardwood tabs to support the shelf |
 |
| Note vertical tab on left of picture in front of grate to hold shelf in place |
Conclusion:
I think of my last cruise as a year long sea trial. I came back with a big list of things I wanted to improve on Luckness before heading out on a longer cruise. I think I've pretty well gone through the list now - there are a few things left, but they will either be done before leaving or early in my next trip.