Anyway, it was one of the last and nastiest jobs I had left on my project list. I was estimating that it was going to be two days of horror. It turned out be more like five.
I've had friends who wanted more pictures on the blog - here they are! You have to be careful what you ask for :-) And a note to anybody who studies the pictures. Um. The head was super clean at the time of these photos - yellow streaks are teak oil that got away from when I was doing that. Seriously.
I've had friends who wanted more pictures on the blog - here they are! You have to be careful what you ask for :-) And a note to anybody who studies the pictures. Um. The head was super clean at the time of these photos - yellow streaks are teak oil that got away from when I was doing that. Seriously.
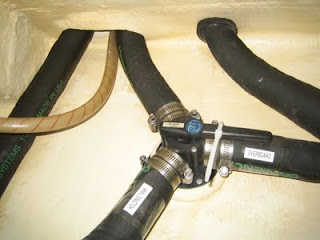
Here is the old hose. I can smell it from here!
The Groco K is bronze painted white. Here's the before picture. Notice the head is held to the platform with four bolts. It would be a good assumption that the bolts are tapped into a metal plate so you could just unscrew them? Or screwed into wood? This turns out not to be the case for the year my boat was built. After googling around for 'problem removing groco k' etc I found a different owner with the same problem. I was turning the bolts but nothing was happening. The problem is that there are nuts underneath there with no way to get to them. Enter my fein tool...
There is a laminated wood base underneath. I cut a 6" x 2" hole starting about 1" below the base. That ended up working very well.
Step zero is to fill the holding tank with fresh water, agitate and pump out. Repeat as many times as you have the patience for. I did this four times and later on I was wishing I had done it some more...
Step one is to remove all the hose. My old hose was wire reinforced which made it a pain to get off. Cut through the wire down to the wire in a few places, peel back the old hose, try to grip and tear out the wire, peel out more hose, strip out more wire - etc, until you're bleeding and the hose is off. Repeat for both ends of all 8 hoses.
At this point you probably have raw sewage in the compartment behind the head and leaking down to the bilge from beneath the sink (but you've built a little dam to receive it down there, right?) Start cleaning all of this up. Just get it over with.
Then make the cut into the base and remove the Groco K. I had the standard rebuild kit for the Groco K which comes with directions.
After disassembling the Groco and soaking in a weak acid solution, this is what you end up with. I've wire brushed some of the old paint off and otherwise cleaned up the parts. Its pretty satisfying how big and beefy all the pieces are, this head is built to last. I hope to not be repairing this head in exotic locations Although I realize how wishful that thinking is...
At this point you just follow the directions and reassemble the head with new pieces. I was left with two unused pieces on the advice from the fellow at the Marine Sanitation store I bought the kit and hose from - the ball used in the foot pedal activated raw water intake and the gasket leading out of the head to the outlet hose are both original - he never saw a problem with those pieces in the heads he has rebuilt, but replacing them has lead to problems...
The replacement hose is Odor Safe Plus sanitation hose. Its pretty hard to work with. I had a heat gun trying to soften it up and only burned myself badly once. (The two minor burns hardly count!) You end up wedged into a tiny space with one arm at full extension trying to push a hose onto the end of a barb where it just doesn't want to go. I would pause and swear at how this was impossible, then carry on and eventually everything ended up where it was supposed to be. This hose carries a five year warranty - I'm hoping for longer.
The final head, repainted with an outdoor spray pain, and a ventilation grill over the hole that was cut. Its working like a champ!
Part of the trick with the PSC 37 is finding storage space for everything you want to bring along. There is quite a large storage space behind the head where the hose is in the above pictures but the smell used to be so awful that it was unusable. Now its back to being just a space and I can start to store stuff there. Probably not food however. But something will go there now.
Preparations continue for my Shake Me Up tour. Lots left to do, but much less than there used to be!


No comments:
Post a Comment